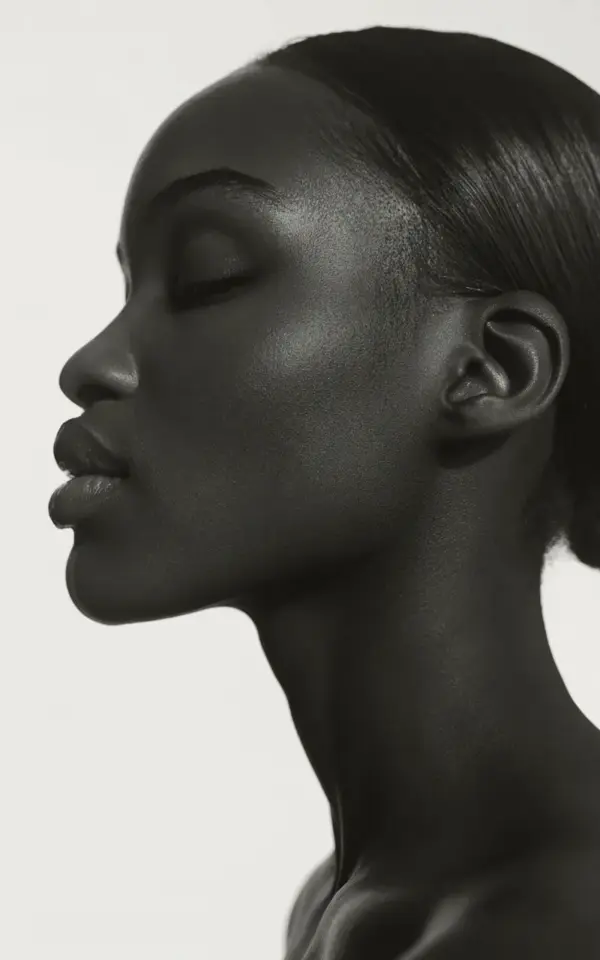
There’s something timeless about a black and white beauty portrait that captures a quiet, confident stillness, and the profile shot we’re talking about here is a perfect example. I saw this image pop up on my feed and honestly, it stopped me mid-scroll because of how the light wraps around the subject’s face, creating that soft shadow line along the cheekbone and neck. The model’s eyes are closed, her lips are slightly parted, and the whole thing feels like a still from a high-fashion film, not just a headshot. This style has been gaining serious traction lately, especially in editorial and beauty circles, because it strips away everything except pure form and emotion. Minimalist black and white portraiture is having a real moment right now, and if you want to recreate that serene profile look, there are a few specific choices that make all the difference.
How to sculpt the cheekbone with soft directional light
The single most important element in this kind of profile portrait is the lighting. It is not about a flat, even wash of light across the face, that kills the depth. What you want is a soft, directional source that comes from above and slightly in front of the subject, hitting the cheekbone at an angle that creates a gentle highlight along the ridge and then drops into shadow along the hollow of the cheek. I usually use a large octabox or a softbox with a grid, positioned about 45 degrees above the subject’s eye level and maybe a foot to the side. Here’s the thing: you don’t want the shadow to be too harsh, but it needs to be defined. Think of it like this: the light should caress the bone structure, not blast it. I once spent an entire afternoon testing different flag positions just to get that shadow to fall exactly along the jawline and neck, and it was worth every minute. For the profile pose specifically, the light should catch the bridge of the nose, the upper cheekbone, and then fall off toward the ear, leaving the far side of the face in a soft, dark gradient. That sculpting is what gives the portrait that high-fashion edge.
Choosing a plain background for minimalist beauty portraits
Background choice is almost as critical as the lighting, but in a different way. The portrait we’re referencing uses a plain white background, which forces all attention onto the face and the subtle play of light and shadow. Honestly, I think a lot of photographers overcomplicate this part. They want to add textures or patterns or props, but for a serene profile shot, less is genuinely more. A white or very light gray background lets the skin tones pop in black and white without any visual clutter. But here is a small practical tip: make sure your subject is standing far enough away from the background so that no shadow from them falls on it. You want the background to be pure, even, and clean. I personally prefer seamless paper because it gives that infinite, dreamy feel, but a well-lit white wall works too. Just watch out for hot spots or wrinkles. One weird thing I’ve noticed: if the background is too cold (like a blue-tinted white), it throws off the skin tones in black and white conversion, so I always warm up my lights a touch. Anyway, keep it simple, let the face be the whole story.
Directing a serene closed-eye pose for high fashion portraits
Ok so the pose itself, closed eyes with a slightly parted mouth, is deceptively hard to direct. If you just tell someone “close your eyes and part your lips”, they often look tense or like they’re trying to sleep on a bumpy plane ride. The trick is to get the model to relax their jaw completely and then gently close their eyes without squinting. I usually ask my subject to take a slow deep breath in, and then on the exhale, close their eyes and let their lips fall open naturally, as if they are just about to whisper something. The key (sorry, I know that’s a cliche, but it’s true) is the softness in the eyelids. There should be no tension in the brow or the cheeks. If you see any crinkling near the outer corners of the eyes, ask them to relax the brow even more. And the lips should be just barely parted, not gaping open. I’ve found that asking people to think of the word “fly” without actually saying it gives that perfect slight opening. It sounds silly but it works. One more thing: the direction of the closed gaze matters. If the model is in profile, their closed eyes should be facing forward, not angling down or up. That keeps the line of the eyelid clean and graceful.
The power of slightly parted lips in beauty photography
Let’s talk about those lips. A fully closed mouth can look too stern or tight for a serene portrait, while a wide-open mouth shifts into a different mood entirely. The slightly parted lips convey a sense of vulnerability and quiet confidence, like the subject is caught in a moment of soft reflection. In black and white, the contrast between the dark opening of the mouth and the lighter skin around it creates a small but crucial focal point. I remember a shoot where the model kept pressing her lips together and the whole image felt stiff. I asked her to imagine she had just tasted something surprising and she relaxed instantly. For the profile view, the parting should be just enough to see a sliver of the teeth or the dark space between them. Too much and it becomes a different expression. Too little and it looks accidental. It’s a tiny detail but it can make or break that high-fashion feeling. Also, keep the lips well-moisturized because dry lips catch light awkwardly in black and white. A little balm goes a long way.
Hair and makeup strategies for minimalist black and white headshots
Because the background is plain and the focus is all on the face, hair and makeup need to be intentional without being distracting. In the reference photo, the subject has a sleek pulled-back hairstyle, which is ideal because it reveals the entire contour of the head and neck. No flyaways, no volume messing with the clean lines. If you’re working with textured hair, like the model in the image, a slicked-back bun or a smooth ponytail works beautifully. It’s not about erasing texture, it’s about controlling the shape so the eye travels cleanly from the forehead down to the jaw and into the neck. For makeup, go for a natural glow, not a shiny highlight. You want the skin to look luminous but not wet. I usually recommend a very light matte foundation with a touch of cream highlighter along the cheekbone, but blended well so it looks like skin. And skip any bold lip color, because in black and white that just becomes a dark blob. Instead, focus on a soft lip balm or a nude liner to define the shape. Also, keep the brows groomed but not too sharp, a natural arch works best for serenity.
Camera settings and lens choices for profile portraits
You don’t need a $10,000 setup to get this look, but the right glass helps. I personally reach for an 85mm or a 135mm lens for profile work because they compress the face slightly and give a flattering perspective. A 50mm can work too but you have to be careful about distortion near the edges. For the profile view, keep the camera at eye level with the subject’s ear, so the line of the nose and chin stays true. As for settings, I shoot wide open or close to it, like f/2.0 or f/2.8, to blur any background texture and keep the sharp focus on the near eye. The shutter speed should be at least double your focal length to avoid camera shake, and ISO as low as possible. One practical note: because you’re shooting black and white, you can get away with a bit of noise if needed, but try to stay under ISO 800. And here’s a weird thing I learned the hard way: use a lens hood. The directional lighting can cause flare on the side of the lens and ruin that pure white background. Not fun to fix in post.
Editing to maintain texture and glow in black and white
Editing a black and white beauty portrait is where the magic can either sing or get muddy. My main rule is to preserve the skin texture. Don’t go overboard with smoothing or frequency separation because that makes skin look plastic. Instead, use a gentle contrast curve, add a bit of clarity to the midtones, and adjust the blacks so they’re deep but not crushed. The goal is to have a beautiful range from pure white (in the background and the highlight on the cheek) to near-black (in the shadow under the jaw and the eye socket). I also like to dodge and burn very lightly, adding a touch more light on the cheekbone and a touch more shadow under the chin. For the closed eyes, make sure the eyelid line is visible and not lost in shadow. And please, for the love of good portraiture, don’t convert to black and white by just desaturating. Use a black and white adjustment layer and tweak the individual color sliders. For example, reds and yellows control skin brightness, blues control the whites of the eyes and background. A few seconds on that can change everything. You want the final image to feel like it was always destined to be monochrome, not like you took the color out as an afterthought.
This style of black and white beauty portrait is not just for high-fashion editorials, it works for personal branding, headshots, or even conceptual art. The simplicity is what makes it powerful. If you try this profile pose with the closed gaze and soft directional light, I think you’ll be surprised at how quickly you get that serene, almost meditative feel. Save this post for your next portrait session and give it a shot. I’d love to hear how it turns out, drop a comment or tag me in your results.
#BlackAndWhitePortrait #BeautyPhotography #ProfilePortrait #HighFashionPhotography #PortraitLighting
Leave a Comment